
Materials Requests aka Purchase Suggestions
and ILL
With these settings, you can:
- Link to an external materials request form or web page
- Link the purchase suggestion form to your ILS (Koha Only)
- Set up a materials request system in Aspen Discovery
- Set up a link to an Interlibrary Loan (ILL) service
Whether you call them material requests, purchase suggestions, or something else, Aspen Discovery has options to allow your users to submit recommendations for titles to purchase for your collection. Of course, if your library does not provide this service, you don't need to select any of these settings. Aspen also includes an entire module that allows you to set up a purchase request form and manage suggestions. Read on to learn what's possible and decide how to best manage your library's material requests.
Aspen also allows linking to an external Interlibrary Loan (ILL) service. Learn how to set up ILL as well!
General Information
To make sure library staff can Enable materials requests, make changes to the Materials Request form, and manage Materials Requests within Aspen, make sure the user(s) who will be responsible have the correct permissions.
You can either create a new Materials Request role or modify an existing role. Both can be done in Aspen Administration > System Administration > Permissions.
Under the Materials Request section, users that will be managing the requests will need:
- Manage Library Materials Requests - Allows the user to update and process materials requests for patrons.
- Administer Materials Requests - Allows the user to configure the materials requests system for their library.
- View Materials Requests Reports - Allows the user to view reports about the materials requests system for their library.
Under the Primary Configuration - Library Fields section, users that will be managing the form and its fields will need:
- Library Materials Request Options- Configure Library fields related to how materials request is configured in Aspen.
Does your library refer to Materials Requests as Purchase Suggestions - or something else?
By default, Aspen uses the wording Materials Requests, but you can translate this to something else that makes sense to your staff and patrons.
Check Permissions
To translate the interface, the library staff member will first need the correct permissions. In System Administration > Permissions > make sure your role(s) have:
-
Administer Languages - Allows the user to control which languages are available for the Aspen Discovery interface.
-
Translate Aspen - Allows the user to translate the Aspen Discovery interface.
Translate
Language is important to clearly convey to patrons what is what in the library catalog. Aspen is an ILS-agnostic system so it is not always set up with ILS-specific language.
In the Koha ILS, for example, the default wording for this process is called Purchase Suggestions. In Aspen, the default wording for this process is Materials Requests. But your library might call this process something else entirely!
In this case, you can translate anywhere it says "Materials Request" to "Purchase Suggestion" in Aspen (or to a completely different term your users are familiar with!)
To do this go to Aspen Administration > Languages & Translations > Translations > check Show All Translations > enter Materials Request in the Show Terms containing field > Update Filters > anywhere in the right hand column where you see Materials Request, change to Purchase Suggestion > Save.
These changes will be applied immediately.
Note: If you are in a consortium/manage multiple catalogs, this will change it on all Aspen interfaces.

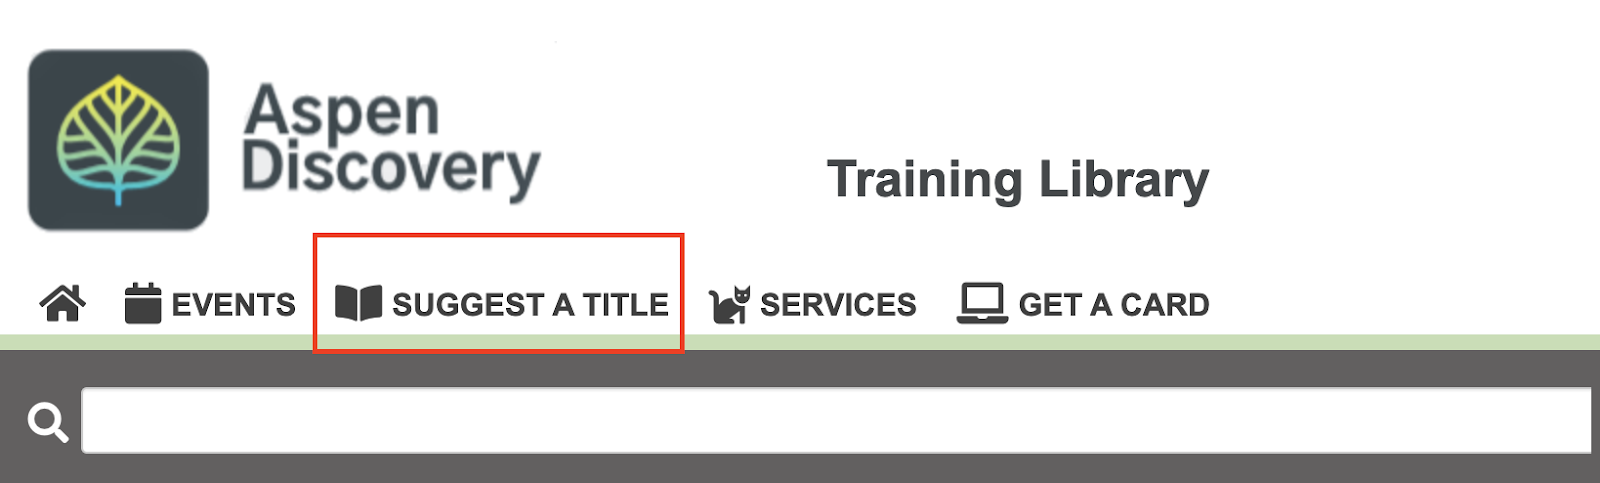
Patrons can find the Materials Request form in up to five places within Aspen:
- Directly via URL:
- {YourAspenURL}/MaterialsRequest/NewRequestIls (Koha ILS Request System)
- {YourAspenURL}/MaterialsRequest/NewRequest (Aspen Request System)
- At the bottom of search results:

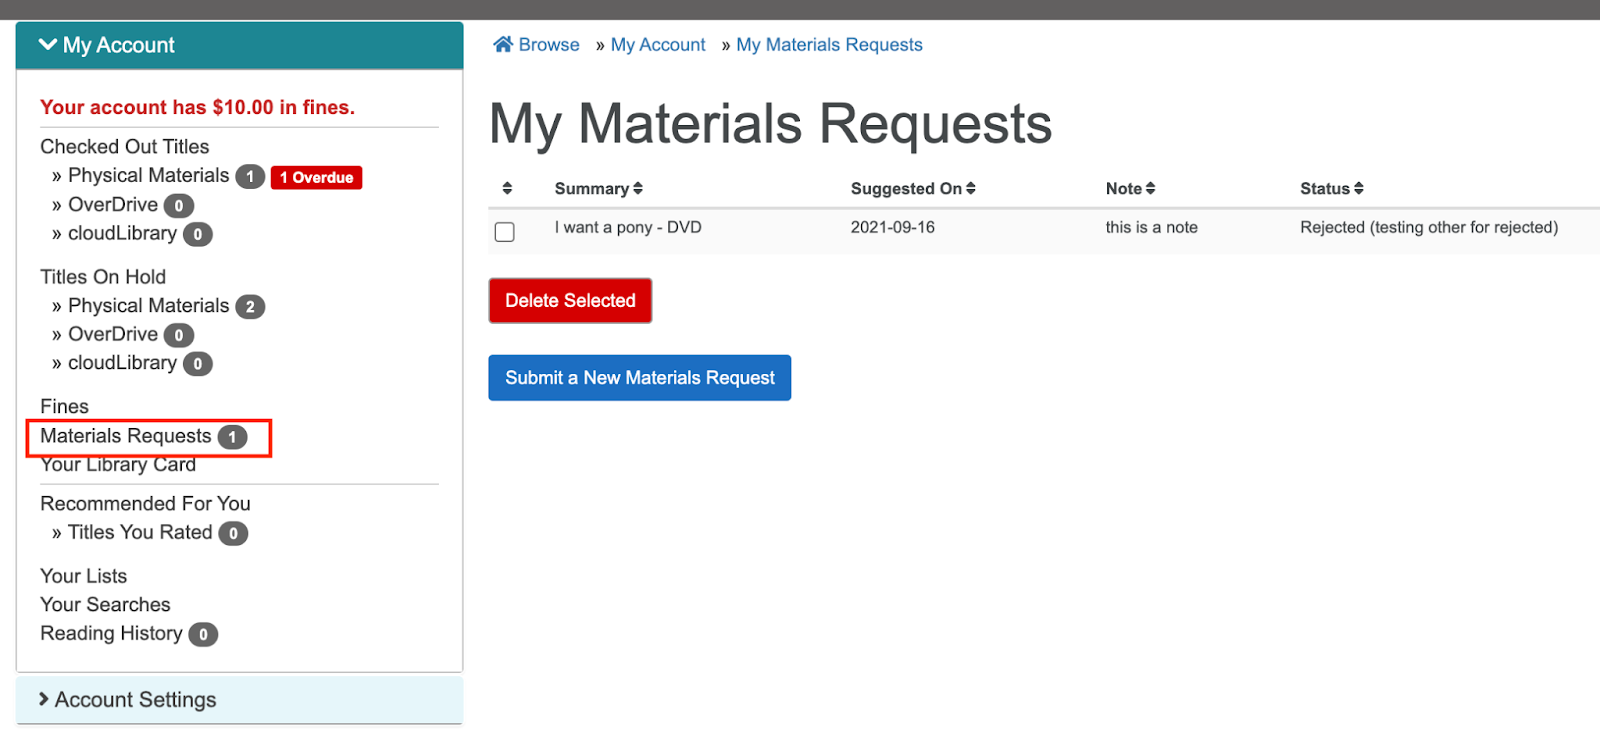
- Within My Account > Materials Requests
-
Each request will display the following fields:
- Summary: Title + Format + Author + Publication Year (if these fields were filled in by them)
- Suggested On: Date of Submission
- Note: Any notes the patron added in the Materials Request Notes field
- Status: The status of their request. The default status will be Pending until action has been taken by a staff member to update the status.
- Users will be able to delete their current suggestions if this option is turned on in Aspen. They will also be able to submit a new request from this screen by clicking the "Submit a New Materials Request" button.
-
- Within the My Account > shortcut dropdown underneath the patron's name

- By setting up a Menu Link of your choice, using the URL above, either along the top navigation bar or in the side/hamburger menu of the Aspen catalog. Learn more about setting up Menu Links in Aspen.
Koha ILS Purchase Suggestions (aka Materials Requests)
If you are a Koha and Aspen library, we typically suggest you set up your Materials Request system in Koha and then Aspen can pull from that setup.
Because Aspen is ILS-agnostic, there is a separate Aspen Materials Request module that will work with any ILS and does not require any set up in Koha. There is more information about that module here. Libraries can also choose to simply display a link to an external materials request form in Aspen (Example: Google Form, Jot Form, page on library website, etc.) without setting up anything in Aspen or Koha. There is more information about that option here.
-
From Aspen Administration, navigate to Primary Configuration → Library Systems. Click into the settings you wish to edit.
-
Scroll down to Materials Request and click to expand.
-
Select ILS Request System under the Materials Request System dropdown. Once selected, you will see some additional options.
- Note: requests cancelled by the user do not count toward the maximum request limits.
Aspen does not honor OPACSuggestionUnwantedFields in Koha and will show pre-set fields by default.
Non-mandatory fields can be hidden by going to Aspen Administration > Local Catalog Enrichment > JavaScript Snippets > Add New > name it something like Hide Fields on Purchase Suggestion form > add information from the snippet below
Use the Inspect tool in the browser to find the row/property ID that you want to hide.
Examples include:
<script>
$( "#propertyRowcopyrightdate" ).hide();
$( "#propertyRowisbn" ).hide();
$( "#propertyRowpublishercode" ).hide();
$( "#propertyRowcollectiontitle" ).hide();
$( "#propertyRowplace" ).hide();
$( "#propertyRowquantity" ).hide();
$( "#propertyRowitemtype" ).hide();
$( "#propertyRowbranchcode" ).hide();
$( "#propertyRownote" ).hide();
$( "#propertyRowpatronreason" ).hide();
</script>
So, if I wanted to hide the Standard number (ISBN,ISSN or other) field, the Publisher field, the Collection field, the Publication place field, and the Quantity field (common fields to hide), I would copy this code:
<script>
$( "#propertyRowisbn" ).hide();
$( "#propertyRowpublishercode" ).hide();
$( "#propertyRowcollectiontitle" ).hide();
$( "#propertyRowplace" ).hide();
$( "#propertyRowquantity" ).hide();
</script>
Changes will go into effect immediately.
Note: If the field is set to Mandatory in Koha in OPACSuggestionMandatoryFields and you hide it in Aspen with JavaScript, the form will not successfully submit. You must remove the field from OPACSuggestionMandatoryFields before you can hide the field in Aspen.
Adjust Unwanted Fields
The default field order on the Purchase Suggestion form is pre-set.
You can adjust the text labels on the field by entering Translation Mode in Aspen (more about language below) and adjusting the text. The fields will still correspond to the fields in Koha, so you wouldn't want to do this to completely swap fields, but this is great if you want to change "Copyright Date" to "Copyright Year" or "Item Type" to "Format" (for example).
Aspen will honor the suggestion limits from the Koha System Preferences:
- MaxOpenSuggestions
- MaxTotalSuggestions
- NumberOfSuggestionDays
When a patron has reached the limit of suggestions, they will see an error message and the last submission will not go through:
The NumberOfSuggestionDays is a rolling number.
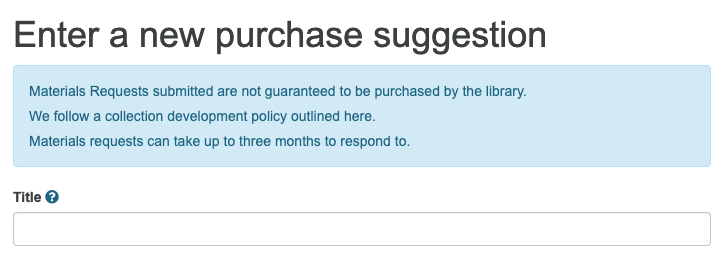
The default message at the top of the Purchase Suggestion form in Aspen reads, "Please fill out this form to make a purchase suggestion. You will receive an email when the library processes your suggestion. Only certain fields are required, but the more information you enter the easier it will be for the librarians to find the title you're requesting. The Notes field can be used to provide any additional information."
To override the default messaging and add messaging of your own, go to Aspen Administration > Primary Configuration > Library Systems > click into your library system > Materials Request > New Request Summary
You might want to include information about your selection process, a hyperlink to your Collection Development policy, and other commonly asked questions related to the process.

Text entered in this New Request Summary box will override the default messaging and automatically appear at the top of the form.
The following Koha System Preferences DO NOT interact with the Aspen opac:
- OPACViewOthersSuggestions– Choose to allow or don’t allow to show purchase suggestions from other patrons on the OPAC.
- Aspen catalog users cannot view other purchase suggestions
- OPACSuggestionUnwantedFields- This system preference will allow libraries to hide fields they don't want/need for their patron to fill out.
- Unwanted fields in Aspen can be hidden with Javascript (see above)
- OPACSuggestionMandatoryFields > Branch Code
- Aspen will populate this field but will not pull in the values from Basic Parameters > Libraries. We suggest you do not make this mandatory for this reason.
- OpacSuggestionManagedBy- Show or don’t show the name of the staff member who managed a suggestion in the OPAC
- Aspen will not show the name of the staff member who managed their suggestion
- AnonSuggestions- Allow or don’t allow patrons that aren’t logged in to make purchase suggestions- this works with Anonymous Patron
- Aspen will force users to log in to fill in the Materials Request form. There is no way to submit an anonymous Materials Request. Staff can assist patrons via Masquerade Mode in placing a Materials Request or by using a staff account to submit suggestions on behalf of a patron without a card.
- EmailPurchaseSuggestions/ EmailAddressForSuggestions- For libraries that would like their purchase suggestions to go to a specific email, this can be set up to match a specific workflow regarding their purchase suggestions.
- Materials Requests forms via Aspen will not trigger
- OPACSuggestionAutoFill- Allow or don't allow OPAC suggestions form automatically filling with data from Google Books API.
- Aspen will not autofill information into the Materials Request form from the Google Books API.
Aspen will not honor OPACUserJS Javascript, OPACUserCSS css or text set in Tools > News > OpacSuggestionsInstructions. All messaging on the Materials Request form is set within Aspen.
Aspen does not perform a duplicate check for the library when a patron submits a purchase suggestion.
Please see this blog post for information on the staff management of Purchase Suggestions within Koha.
While the IndependentBranches system preference in Koha prevents staff (but not Superlibrarians) from modifying objects (holds, items, patrons, etc.) belonging to other libraries, this setting doesn’t affect purchase suggestions management. Staff with the suggestions_manage permissions can view and edit suggestions from any branch.
In Koha, you can set permissions per library location to manage purchase suggestions. The mandatory fields and authorized values would need to be the same on each of the forms within Koha.
In Aspen, the decision to accept and display the Purchase Suggestion form can be set per library system. To turn this on/off for a library system, go to go to Aspen Administration > Primary Configuration > Library Systems > click into your library system > Materials Request > and select None to turn off materials request or one of the other options to turn on. To turn this on for a large group or all libraries, use the Batch Update Selected or Batch Update All tool at the bottom of your Library Systems
Aspen Materials Requests
1. Check Your Permissions
In order to see the Materials Requests module in Aspen, the admin account will need at least one role with the Materials Requests permissions assigned to them. Learn how to manage roles and permissions here.
2. Enable Materials Requests in Library System Settings
Set up the form in Aspen Administration > Primary Configuration > Library Systems > click into your system > scroll down to Materials Requests.
- Select Aspen Request System and check Turn on Materials Request for Public.
- Choose Max Requests Per Year per user (i.e. "how many requests can a user submit within a 365-day period?")
- This is a rolling year based on each patron and when they submit their requests, not on any set calendar date for all users.
- Choose the Max Open Requests at once per user
- Add any messaging around your materials request policies and processes in New Request Summary
- Decide if you want materials requests to be automatically deleted after a certain amount of days in Delete Closed Requests Older than (days)
- Note: Aspen will retain materials requests for a minimum period of 366 days (1 year + 1 day). This is so that the Max Requests Per Year can be accurately reflected. If you leave 0 here, then materials requests will not be deleted. You must put a time frame higher than 366 if you want a custom time frame.
3. Load Default Statuses
From Aspen Administration, visit Materials Requests > Manage Statuses. Click the Load Default Statuses button to load in a selection of statuses. These can be customized to your liking -- detailed instructions are below in the "Manage Statuses" section on this page.
4. Test and Revise
Visit the materials request form to see what you'd like to adjust and submit test requests. Find the link to the materials request form on the bottom of any search result page, or from within your user account (click your username > Materials Requests).
The Aspen materials request settings allow you to add or remove formats that your users are allowed to request. If you have completed the default setup, you should see the default formats listed here. If not, click Set Materials Request Formats To Default to automatically load the default formats.
From here, remove any formats you don't want users to be able to select when submitting requests. You can also click Add New and manually type in your Format, Format Label, Author Label, and select any Special Fields that should show additional options associated with that format.
Once these format fields are set, they will display as a dropdown menu on the materials request form:
For any formats with Special Fields for Format selected, an additional field will appear after it is selected.
In this example, when DVD is selected, a Season field appears.
Note: By default, "Format" is a required field. You must enter a value here.
Materials Request Form Fields
To configure the form fields that appear on the materials request form, visit Library System settings > Materials Request > Materials Request Form Fields.
If you have completed the default setup, you should see the default form fields listed here. If not, click Set Materials Request Form Structure To Default to automatically load in the default selection of form fields. You can then take a look at the materials request form and see how the form fields in these settings manifest on the live form, which can be helpful for deciding how you'd like to customize your form.
Click Add New to add additional form fields, where you'll be able to enter in the Form Category, Field Label, and select the Field Type.
Sort
Move the arrows up and down to set the order in which you want the Form Categories and Fields to Display on the form.
Form Category
The Form Category becomes the header for different sections of information on the Materials Request form. Aspen will group fields that share the same Form Category within the same section on the Materials Request Form.
In this example, 'Supplemental Details (optional)' and 'Contact Information' are the Form Categories, and Fields matched to those Form Categories display underneath. They've also clearly added '(optional)' to the Supplemental Details Form Category to help users understand they do not need to fill out all the extra information.
Tip: If you have set up Menu Links, setting up Form Category and Field Label works in a similar way as Menu Link Category and Menu Link Text where you are setting a parent category and then matching data underneath
Field Label
Field Label is how you want the field/question/data collection point to display on the form.
Field Type
The Field Type specifies the type of information required for the field. Depending on the Field Type selected, Aspen will know to automatically pull in some additional information.
In this example, when selecting the Field Type of Age Level, Aspen automatically creates a drop down of related default choices - Adult, Teen, Children, and Don't Know.
In this example, when selecting the Field Type of Book Type, Aspen automatically creates a drop down of default options - Fiction, Non-Fiction, Graphic Novel, and Don't Know.
Delete
Remove fields from the Materials Request form using the Delete button under the Actions column, then Save to make instant changes to the form.
Required Fields by Default
By default, Format and Title are set to be Required Fields. There is nothing for library users to do to set this up. These fields will automatically be required.
Setting Up Additional Required Fields With JavaScript
Currently, there is no additional options in the Aspen Request System for selecting which fields are required vs. optional.
If a library has specific fields that they want to make required, they can manipulate the form with JavaScript.
To add a JavaScript snippet go to Aspen Administration > Local Catalog Enrichment > JavaScript Snippets > Add New
- Give your Snippet a name
- Add in the code to Snippet (include script tags)
- Select the Library System the snippet corresponds to
- Save
In this example, the snippet used was:
<script type="text/javascript" >
$("select#ageLevel").removeClass('form-control').addClass('required form-control');
$("select#bookType").removeClass('form-control').addClass('required form-control');

var $span1 = $('<span class="label label-danger" style="margin-left: .5em">Required</span>');
var $span = $('<span class="label label-danger" style="margin-left: .5em">Required</span>');

$("div#materialsRequest label[for='ageLevel']").append($span1);
$("div#materialsRequest label[for='bookType']").append($span);
</script>
The Materials Request form now has Age Level and Book Type as required fields:
Manage Statuses
To Manage materials request statuses and notices, go to Aspen Administration > Materials Requests > Manage Statuses.
Here you will see a number of out-of-the-box statuses you can choose from as a starting point. From here, you can edit the existing statuses to suit your needs, delete unwanted statuses, and add additional statuses.
When editing a status, you can determine the following:
Set a "Default" status: The Default status is the status that gets automatically assigned to a request upon submission. Only one status can be designated as the "Default" status.
Set a "Cancelled by Patron" status: This is the status that a request gets assigned when a patron cancels their own request. Only one status can have "Set when patron cancels?" checked.
- Note: requests cancelled by the user do not count toward the yearly maximum request limits.
Set "Open" statuses: Request that are marked as "Open" statuses will be considered open. Usually this means that the request is pending/in progress. These statuses will count toward the Max Open Requests total defined in Library Systems.
Set whether the status triggers an email to the patron: Checking "Send email to patron?" will send an email to the patron once that status is selected. The email text can be configured when editing that status. You likely don't need this checked for every single status; for example, you may want to let the patron know the request is filled or cannot be ordered, but you probably don't want to notify them of internal processes, like "Request referred to ILL". Click Edit next to a status to see and modify the email notification that is currently set up for the statuses that have email notifications enabled by default.
IMPORTANT: In the Manage Requests section, changing an item's status to a status with "Send Email to Patron?" enabled will automatically send an email to the patron. This means that if you change the status back and forth, multiple emails to the user will be generated.
Manage Requests
In this section you can view any open requests. On any request, click the Details button to see full form submitted by the user. Click Update Request to change the status. You'll also be able to export requests to a spreadsheet from the Manage Requests screen. You can also assign a staff member to follow up on the materials request.
From this view, library staff can see a list of submitted Materials Requests.
Library staff can use the Filters or the fields along the top to perform a search in the various columns.
Statuses to Show
The Statuses to Show will default to any statuses defined as Open Status? > Yes in Materials Requests > Manage Statuses.
When you are working on Materials Requests, if you select/deselect specific Statuses to Show and click Update Filters, those statuses will be applied during your logged in session so that those filters won't reset. When you log in/out they will go back to the defaults.
By clicking into Details, staff can see the entire submitted form.
By clicking Update Request, staff can change the status of the request.
By clicking Export Selected to Excel, staff can dowload a spreadsheet of submitted Materials Requests.
Sample Excel Data:
In the dropdown menu next to Assign selected to, library staff can assign another staff member the management of that pending request.
By checking on a Materials Request and then selecting the dropdown menu for Change status of selected to, library staff can update the status of multiple materials requests at once.
Edit Materials Request Display
You can adjust the columns that display on the "Manage Requests" page to display different information. These columns can be edited by going to Primary Configuration > Library Systems settings > Materials Request. In the section "Fields to display on Manage Materials Request Table," you can click Add New to add the various fields you need.
After saving the settings, you will be able to re-arrange the columns with the up/down arrows.
Usage Dashboard
The Materials Request Usage Dashboard is availble in Aspen Administration > Materials Requests > Usage Dashboard.
It shows materials requests stats for each status.
You can choose between Location to show stats for All or a specific system on your server.
The available statistics will vary based off of your personalized Statuses that are set up on Aspen Administration > Materials Requests > Manage Statuses.
Summary Report
The Summary Report is available in Aspen Administration > Materials Requests > Summary Report.
This report shows a history of when and how many materials requests were submitted by date. The activity report can be adjusted by a time period (day, week, month or year) or by a date range. The default summary will display an overview of the various statuses. To remove certain statuses from view, click on the individual status color box along the top (ex: Created, Request Pending, Cancelled by the Patron, and Item Purchased). This will eliminate those statuses from the chart. To see them again, click them again and they'll reappear.
In the table below the chart, you can see the date and how many requests were submitted that day - as well as how many purchase suggestions are in each status.
An Export to Excel button is available to export the data.
Report by User
The Report by User information is available in Aspen Administration > Materials Requests > Report by User.
In these reports, you'll be able to see patron information along with how many requests they have in various statuses. The default view is for the Request Pending status. To see different statuses, use the Filters at the top.
Note: Some information was omitted in the screenshot for privacy.
This chart can also be Exported to CSV.
As of the 23.03 release, you can now receive an email when materials requests have been submitted via the Aspen materials request system. Staff can also receive emails when they have been assigned to a request.
Email Notifications for New Material Requests
- Visit Primary Configuration > Library Systems > Materials Request.
- Check the box for "Send email to library when Materials Requests are created"
- Enter in the email address that should receive notifications. Multiple email addresses can be entered here if desired, separated by semicolons and no spaces.
When new requests are submitted, the email will come from the email address specified in System Administration > Amazon SES Settings > From Address. If you'd like this email address to be different, please submit a support ticket.
The new request email will have a few details about the request with direct links to view and manage the full request.
Email Notifications When Assigned to a Request
To receive emails when you are assigned a new request to manage:
- Visit Primary Configuration > Library Systems > Materials Request.
- Check the box for "Send an email to staff when they are assigned a Materials Request."
Next, each staff member involved in managing materials requests must log into their account, click their username, and click Staff Settings.
In the Materials Request Management section of Staff Settings:
- "Receive email when a Materials Request is assigned to me": toggle to ON.
- If you no longer wish to receive notification emails when assigned to a new request, toggle this to OFF.
- You may also enter in a Reply-To Email Address and/or an Email Signature.
When a materials request is switched to a status that generates an automatic email to the patron, the patron will see the email signature you provide. If they reply to the email, it will go to the reply-to email address you provide.
Make a Status Trigger an Email
You can decide which statuses trigger an email in Aspen Administration > Materials Requests > Manage Statuses. From this screen, click Edit on the status, then check Send Email To Patron? to have that status trigger an email. The email will be sent to the patron automatically as soon as the request is switched to the corresponding status.
Edit the Email Message
When you click Edit on each corresponding status, you can customize the message in the Email Template section:
Edit the Email Subject Line
The default subject line for materials requests notifications is: Your Materials Request Update.
You can translate this in Aspen Administration > Languages & Translations > Translations.
Who Does the Email Come From?
The email is sent from the email address set up in Aspen Administration > System Administration > Amazon SES Settings > .
By default, all Aspen sites are set up with Aspen's email relay of noreply@aspendiscovery.org.
If you want to have the email come from your own domain, we can work with our Systems Team to add and verify your domain.
Email Tokens
The tokens available for use in email forms are:
- firstname
- lastname
- phone
- cat_username (this is patron cardnumber)
- title
- season
- magazineTItle
- magazineDate
- magazineVolume
- magazineTitle
- magazineDate
- magazineVolume
- magazineNumber
- magazinePageNumbers
- author
- format
- formatId
- subFormat
- ageLevel
- bookType
- isbn
- upc
- issn
- oclcNumber
- publisher
- publicationYear
- abridged
- about
- comments
- status
- phone
Example:
Hello Sally! Your suggestion of 'Harry Potter and the Halfblood Prince' will be purchased by our library and placed on hold for you on arrival.
Tokens Used:
Hello {firstname}! Your suggestion of {title} will be purchased by our library and placed on hold for you on arrival.
Other Materials Request Systems
If your library uses an ILS other than Koha and you do not wish to use Aspen's materials request module, you may continue to offer materials requests to your patrons using an existing website or form. To set this up:
-
From Aspen Administration, navigate to Primary Configuration → Library Systems. Click into the settings you wish to edit.
-
Scroll down to Materials Request and click to expand.
-
Select External Request Link under the Materials Request System dropdown. Once selected, you will see some additional options.
Turn on Materials Request for Public: This will be checked by default. Uncheck this box if you need to disable access to materials requests for any reason.
External Materials Request URL: Enter in the URL for your materials requests. This could be a page on your website, a link to a Google form, etc.
The "New Request Summary" text box can be ignored.
Save your changes, and patrons will now be able to access this link at the bottom of every catalog search page.
Note: When using the External Request Link, users will not have a materials request section in their accounts.
Interlibrary Loan (ILL)
Libraries can send users out to a link of their choosing - either directly to an ILL service or to an informational page related to ILL on your website.
To set up this URL:
- Navigate to Primary Configuration > Library Systems > edit your library's setting.
- Scroll down to Interlibrary Loans and click to expand.
- Fill in the name of the interlibrary loan service and the URL.
- Save your changes.
Once saved, users will be able to find the link to your ILL service at the bottom of search results.
If you need to change the wording of this message, you may use Aspen's Translation Mode. Learn More.
You can also add a link to ILL information as a Menu Link. Learn more.
To set up INN-Reach, go to Aspen Administration > Primary Configuration > Library Systems > click into the library system > Interlibrary loans
First, fill in the Name of the Interlibrary Loan Service
Next, fill in the Interlibrary Loan URL
Then, expand the INN-Reach menu to see additional configuration settings.
Add INN-Reach to Dropdown Search
To add INN-Reach as an option in your dropdown search, make sure the first steps above are filled in and then expand the INN-Reach section and check Repeat in INN-Reach.
Once you save, you should see the INN-Reach search as one of the options in the dropdown:
Show INN-Reach Results At End of Search
To add INN-Reach results at the bottom of your Aspen catalog search results, make sure the first steps above are filled in and then expand the INN-Reach section and check Show INN-Reach Results At End of Search.
Once saved, you should start seeing results from INN-Reach at the buttom of search results.
ILLs in the Patron Account
ILL holds and checkouts will show in the patron account with their other checkouts and holds.
ILLs will not have While You Wait or You May Also Like in Reading History, Checkouts and Holds.
They will also not have Freeze/Thaw options in Holds.
INN-Reach in Record Display
There is a setting in Grouped Work Display > click into settings > Full Record Options for INN-Reach that is legacy functionality not a part of the current integration.
If added to the Full Record Options, the menu will display and show constantly loading like this:
We suggest that you delete this from the Full Record Options. If you would like to see this enhancement, please put in a ticket to request this development.
*Koha Only*
By default, Aspen will look for the item type value of ILL for checkouts, holds and reading history.
If you are using a custom item type, you can define this in:
Aspen Administration > Library Systems > Interlibrary Loan Item Types > Add New
To include a search for WorldCat in your search results options, go to Aspen Adminitration > Library Systems > click into your library system > Interlibrary Loans.
- Under Interlibrary Loan System, select WorldCat.
- Enter the name in Name of Interlibrary Loan Service.
- Next, click on the WorldCat section.
- Check the box for Repeat in WorldCat if you would like users to be able to search within WorldCat directly from Aspen by switching the search dropdown.
- Enter the WorldCat URL you want to search.
Once set up, when a user searches within the library catalog from Aspen, clicking the Request through ILL button from the bottom of search results will carry over their search terms to the WorldCat search.
Video Tutorials
